etsy mini

Wednesday 11 December 2013

Original textile ACEOs

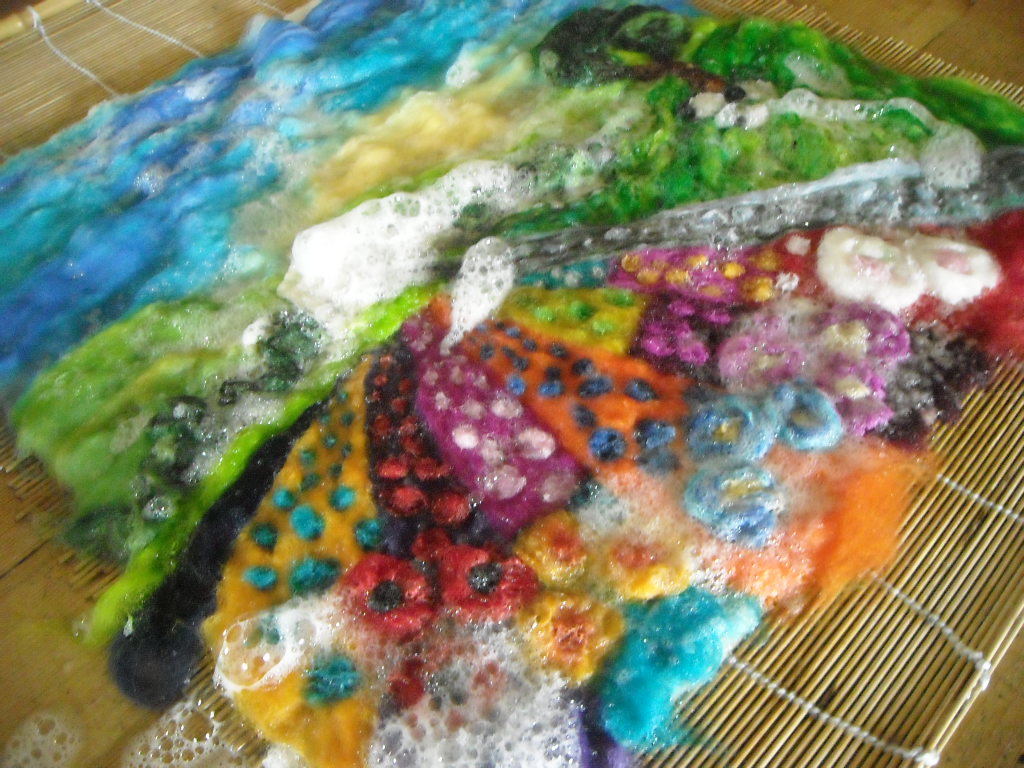
I have been doing my homework on ACEOs lately. An ACEO is a piece of artwork in any medium but it must be 2 1/2 x 3 1/2 inches in size. It can be a print or an original.
People but and collect them for various reasons. Some people make a hobby out of collecting them and may keep them stored in collectors books. Some people frame them in special ACEO  frames and either display them in groups or use them to fill a small space on the wall. I have seen them framed with several in a frame and think that looks nice. Anyway they are inexpensive and brilliant for anyone who wants affordable, original art.
I usually work on a much bigger scale and the first one I tried to make took ages. I decided to list it in my Folksy shop and then went outside to feed my pigs and sheep. When I got back it had sold!
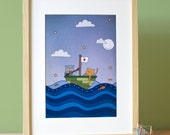
For the last 2 days I have been experimenting and playing with different methods of producing these little pictures. I won't make my first million by selling them but they are fun and pleasurable to make so I have decided to give it a go. These are the ones I have produced whilst playing and I will be listing them on etsy and folksy.

Monday 9 December 2013

Felted dog toys!

I've always said that felt is a versatile fabric but this is a new use that I have heard of. Felted dog toys! Sara Goforth has an etsy shop in which she sells wonderful crochet and felted ones.
Sara crochets the shape she wants, puts a tennis ball inside and felts the whole lot in the washing machine.
She says that the crochet toys are suitable for smaller dogs and the felted ones are fine for dogs over 50 lb. They can chew on them and play tug of war without any ill effects. What a brilliant idea. They can also be washed on a cool washing machine cycle.
I know that anything felted in the washing machine becomes really dense and tough but had never considered this use.
Go and take a look at Sara's shop https://www.etsy.com/uk/shop/goforthcreate?ref=l2-shopheader-name
you should be just in time to buy your special friend a Christmas gift.
Here is some of the feedback Sara has received
"I will admit when you first said that you made crocheted dog toys I was a little skeptical as to how durable could they be. Let me tell you that I have 4 dogs....a 90 lb lab, a 65 lb labradoodle, a shoe sized yorkie-poo, and a 7 week old Australian Shepard/ Blue Heeler mix puppy ....3 of the 4 are very hard on toys and are big time chewers....they have been passing it around, chewing on it, playing tug a war and keep away with it and have yet to make it look anything less then brand new. I am very impressed."

Friday 29 November 2013

New felt art pictures on Folksy

I just thought I would show you one of the pictures I have just listed on Folksy. I am using this website as well as etsy because we have almost reached shipping cut off times for international orders. Many of the pieces on there are ideal gifts.
Here is the link for the Folksy shop

http://folksy.com/shops/feltart

Wednesday 20 November 2013

Christmas discount for felt art paintings

Hello every one,
I just thought I would let you know about the discount I am offering to my FB followers and blog readers. It is valid from now until the end of January 2014. You will receive 10% discount. Use the code FB1314 at the checkout of my etsy shop.
Please check my shipping and policies page for posting deadlines if you want to receive pre Christmas.
Here is one of my recent felts to whet your appetite!
https://www.etsy.com/uk/listing/166467944/felt-art-picture-textile-art-textile?ref=shop_home_active

Wednesday 30 October 2013

Making paper with plants part 2

In my last blog we did the preparation for paper making and are now ready to go ahead and form sheets of paper.
In your plastic tray you need to make a mould. This is simply 3 layers of newspaper. Fold the bottom one in to a small rectangle, the next in to a larger rectangle and sit it on top of the first one. Next put on the top piece of newspaper which should be bigger again. Cover with a damp cloth and you should have a little hill.
Now in your other plastic bowl mix the pulp with enough water to scoop your deckle and frame into. I couldn't photograph this part as I only have one pair of hands!
You need to hold the deckle, net side upper most with the frame on top. Now scoop the deckle and frame in to the pulpy water mix. Start at a 45 degree angle and level out as you go. Shake from side to side and back to front as you bring it out of the water then hold it there until the water has drained out. The pulp should evenly cover the netting with no holes. If you have holes tip it all back in to the water and start again.

Move to your mould and tip the pulp out of the deckle and on to the mould.
Cover this with another piece of damp fabric and continue until all of the pulp is used up. Make sure to stir the pulpy water in between each sheet of paper so the vegetable matter does not all sink to the bottom.
The next stage is drying. With the paper still on the fabric take them and lay flat in a warm room to dry. This will take at least 24 hours. When dry peel the papers off of the cloths and hey presto! you have paper.
To be honest my paper was a little brittle and crinkly. I would not use broccoli leaves again. I have had success before with other vegetation though so don't be put off. Probably best to start with grass or hay.
Have fun!

Thursday 24 October 2013

How to maker paper from plants part 1

After my mixed media post in which I used handmade paper I've been requested for instructions on how to make it. You can, of course, make paper from recycled paper or buy pulp all ready to use but it is soooo satisfying to make it from raw products that you have gathered yourself.
Theoretically, paper can be made with any plant - fresh or dried but some make better paper than others. All types of grasses even dried in the form of hay make good paper but why not try something else and experiment? Have a look around your garden if you have one. If you are a city dweller check out roadside weeds and fallen leaves in the park. I chose to use the tough, outside leaves from broccoli plants because I have a lot of them in my vegetable patch. They were a nice reddish green colour and I thought they might make an interesting coloured paper. Do remember that the colour of your plant material will affect the colour of your paper so if you want writing paper use pale plant material.
Before you start there are a few things you need. Probably the most important . is your deckle and frame.
The deckle is a wooden frame covered in mesh and the frame has to be of the same size but without the mesh. This are the tools you will use to scoop up the pulp and shape it in to paper. You could use 2 picture frames of the same size and staple old net curtain to one.
You will also need a large stainless steel or enamel cooking vessel. I used a bucket. Also a large plastic vat. It has to be a bit bigger than your deckle. I used the sort of plastic tray which you can buy as a cat litter tray.You will need to some sheets of fabric also a little bigger than the deckle. Reusable kitchen cloths are OK and 2 pieces of board. If you are using edible plants you could use chopping boards. You will also need a solution to cook your plants in which will break down the cellulose. The best liquid is wood ash lye. For some people this may not be practical to make in which case you can add washing soda to your cooking water.A blender is useful too. If you are making the wood ash lye here is the recipe.
1 bucket of wood ash from a 100% wood fire
enough water to cover the ash
Make sure the room is well ventilated as this stuff smells!

boil the wood ash in water for 1/2 an hour and leave to soak over night. In the morning strain through some netting. KEEP THE LIQUID and discard the wood ash. You will end up with a disgusting browny pink liquid like this.

Next you need to pick your plant material. You can see my broccoli leaves here. At least a bucket full will be needed. Now you have to cook the plants in the wood ash lye. Use the stainless steel or enamel pot and bring to the boil. Cover and cook until very soft. Grass cuttings take at least an hour. My leaves took 1 1/2 hours. Make sure that they are covered with the liquid. If you don't have enough you can add a little water. Again make sure you have enough ventilation.
When you have very soft vegetation
you can strain. This time discard the cooking liquid and keep the plant matter. There will probably still be lumps of plant in the pulpy mass so whizz it through a blender until it looks like the picture above. If you do not have a blender you can put it in a large container and beat with a heavy stick - maybe a rolling pin.

Your pulp is ready to use! Next time I will post the actual paper making process. 

Tuesday 22 October 2013

Spotlight on Joanne Hawker

During the month of September Etsy UK organised a mentor month where we teamed up with another shop owner with different strengths to our own. I was teamed up with Joanne who helped me with photography. Here is a little bit about her and some samples of her work .

Set of 4 Blank Flowers and Bee's Notecards

1. Have you always wanted to be a graphic designer?
Yes I have actually! Well, except for a phase when I wanted to do Horse and Stable Management (I don’t even have a horse and my dad put a stop to that!) I knew from an early age that I wanted to do something in the creative industry because its always been a part of my life. In primary school for instance we hand bound all our own exercise books, made numerous lino cuttings, candles, our own classroom curtains, and I spent hours tracing images out of books. For Christmas my wish list was always full of creative kits! I only really decided on Graphic Design in year 10 when we had to make our GCSE choices.
2. How long have you been running your own business?
I graduated from university in 2010 so I opened my online shop then. However, it’s only really taken off in the last year when I joined Not on the High Street. It’s still very much a hobby. Before I opened my shop I was also doing the odd bit of freelance design work too.
Woodland Fox iPhone 5/5s Case

3. What inspired you to open your online shops?
I found that I was creating lots of illustrations and patterns but didn’t have anything that I could do with them so I started to offer them up as prints. I thought that it was better to do something positive with them rather than hiding them away in a folder on my desktop. Not only that but I gave up on searching for a job in the creative industry because no one ever replied so I decided that eventually I will be my own boss.4. What part of running your own business do you enjoy the most and least?
The best of it is having full creative control. There’s no one telling me what I can and can’t design. It’s also lovely when customers leave nice messages about how much they like your work. That’s always a really big confidence boost. The thing I least enjoy is the paperwork! But I guess it’s got to be done!

5. How do you get ideas for your images?
EVERYWHERE! It could be conversations, a weird dream or songs. But I mainly get my inspiration from the natural environment. You will see notice lots of flowers, bugs and animals featured in my work!You Are My Sunshine Lyric A4 Print


6. Do any other designers inspire you?
There are lots of people I find inspiring! Alice Potter, Alyssa Nassner and my good friend Emmeline Pidgen to name but a few. I follow a lot of pages on facebook and twitter too so I’m constantly being bombarded with pretty things which isn’t so bad!

7. Which is your favourite item in your shop and why?
At the moment it’s my iPhone cases! I had such fun making them. I pull a lot of silly faces anyway so these can only add to the fun! Now other people can join in too!8. What would you like to be doing ten years from now?
In ten years time I’d like to quit my day job and be my own boss full time in a nice little house of my own and a nice big office! That’s the plan anyway! I’ll get there slowly but surely. I’m determined!

9. Where else can you be found on the web?
Facebook: www.facebook.com/JoanneHawkerDesignandIllustration
Twitter: www.twitter.com/Joannehawker
Blog: www.origamichicken.com
Etsy: www.etsy.com/shop/joannehawker
Not on the High Street: www.notonthehighstreet.com/joannehawker
Wanelo: www.wanelo.com/joannehawkerThe Owl And The Pussycat A4 Art PrintWhy not pop along to Joanne's shop and see more of her work?


Tuesday 15 October 2013

Fun with mixed media

Yesterday I decided to play with mixed media techniques. As the leaves are changing colour I decided to base my design on an Autumn leaf. This is what I came up with
I'll tell you how I made it and you might like to experiment with ideas of your own.
As a firm base for the leaf I made some burgundy coloured felt with a few silk inclusions and whilst that was drying I set about making the textured background.
Materials I used 
Handmade paper, a brown paper bag, some silk carrier rods which had been separated into thin layers and some snippets from some hessian fabric. 
First I wanted to unify all of the elements so I made some strong, black tea and popped the carrier rods in it then painted the handmade paper with tea as well. I left the brown paper as it was but scrumpled it up until it was soft and nicely textured.
these all needed to dry as well so I began the leaf itself. I took the dry felt and chopped up all of the red fabrics I thought would blend together. I used silk, red ribbon, red scrim, red cotton fabric then added a little piece of orange silk and some chopped up gold thread. These were all bonded to the felt with bonding powder. You could use bondaweb. Next I took some sheer, red fabric. I think it is polyester chiffon. It MUST be a man made fabric so that you can melt some of it later. This was then bonded on top of my fabric snippets.
I made a template of a leaf and pinned it to my fabric sandwich and using free machine stitching outlined the shape of the leaf on to my fabric. Discard the paper template and first cut around the outside of your stitching and then add more stitching for veins. I then took some wrapped cord and couched it down the middle for the central vein and stem.
Now the fun bit! Take a heat tool, you can use a soldering iron, a heat tool that looks a bit like a hairdryer or as a last resort a lighter will do. Make sure you are standing near the sink in case of fire. Now apply heat to parts of the leaf to expose your fabric snippets in some places and the felt base in others.More stitching can be added if you wish. I added a few french knots by hand.
Now back to the paper.
So all of the elements would blend together more easily I decided to tear the paper rather than cutting it. I played around with the papers and carrier rods until I was satisfied  and then bonded then all together along with some tea bag papers and the hessian snippets. 
All that was left was to stitch the leaf to the backing which I did by hand down the central vein only so the leaf stands proud. I mounted it on a piece of mount board and trimmed the edges.
I am going to put it in a box frame to display. Here is a close up picture so you can see the textures more clearly.

Friday 27 September 2013

Mynydd Bach - It's history by Eirian Jones

I went to the book launch of Mynydd Bach last night. Mynydd Bach means' little mountain' in the Welsh language and we live in the foothills of the Cambrian mountains. I am honoured to be featured in the book as there is a section about local artists.
The launch was held in Blaenpennal chapel which was overflowing with people. I was lucky enough to grab the last seat. Refreshments were in the vestry afterwards which was also overflowing (nice cakes though).
Here is the book
and here is my page. I gave the author the felt art I made depicting a hill farmer as that is the traditional occupation of the area and I thought it would be apt.

Tuesday 17 September 2013

kindle case - portable felt art

I have decided to add gadget cases to my shop. Kindle cases are an ideal Christmas gift especially for someone with a new kindle. I can make different sized cases  and will make them to order. Because I felt them very densely to make them strong they are hard work to make.
I'm wet felting over a form so there are no seams to come undone. These cases are practically indestructible and each one is a different piece of art work in its self.
Portable felt art to protect your gadget!
Here is the first one.

Tuesday 10 September 2013

Framed felt art

As you know, I usually sell my felt paintings on artist's canvases as I don't like to hide the texture behind glass. Some people, however worry about keeping the felt clean and dust free. It is not difficult to keep clean and I always include care instructions with artwork but some people just like their art behind glass.
I recently came across some cute little box frames and decided to offer framed felts for sale. I only have small frames at the moment but will get some larger ones if these prove to be popular. Here is the first one.

Monday 2 September 2013

Learning Tunisian crochet

I have a new addiction. I mean interest! Tunisian crochet.
In the UK it is not a widely known craft and I had never even heard of it until I joined Etsy. I liked the look of it and decided to have a go. After finding instructions I decided to make a stripey blanket ( nothing minor). I have plenty of yarn lying around the house and thought it would be a good way to use them up. I also love the work of Kaffe Fassett and like his motto of if you're not sure that the colours  match add 20 more! Well I will admit to buying a few extra colours.
I started with a small  practice piece where I did manage to gain a few stitches on some rows and lose a few on others but after a couple of hours got the hang of it. I started my blanket and can't put it down. I got plenty of time at the weekend because we had a long car journey and I was a passenger. Here is what I've done so far
As you can see I haven't sewn in the ends yet even though I told myself I would do it as I went. I just can't wait to start on the next set of colours. I will do the sewing in soon I promise. I intend to crochet all the pieces together but can't decide on what colour to use. Should I go for a neutral colour for all of the joins or try to use a colour which is on the end of each rectangle to join them?
Any advise from an experienced blanket maker would be appreciated. Actually any advise from anyone would be appreciated.
Must go and crochet.

Monday 19 August 2013

Saturday 17 August 2013

Tallenge vote.

Hi everyone. I've just been invited to take part in a Tallenge competition. Any one can vote for my art work. I would really appreciate some votes! Thankyou.
Here is the link if you wish to vote.

http://www.tallenge.com/vote/vote.aspx?vid=ff9bb5d7-63a0-4c3e-bb5d-84762e28eaa1

Wednesday 14 August 2013

affordable felt art

I have just discovered some really cute canvases sized 8 x 8 inches which is 20 x 20 cm. They are big enough for me to make a decent landscape on but small enough to be affordable at $39.00 or £25.00. I have listed the one pictured below and am working on another one. The new one shows a landscape with a washing line and a patchwork quilt hanging out to dry. When it is complete I will show you.

Monday 29 July 2013

Stitched felt paintings

I have been playing around with more stitching on my felts and decided to go for it and make the stitch a central focus on a felt. This is what I did.
I made a wet felted landscape with the silhouette of a rooster in the foreground. I made the silhouette in a vaguly chickeny sort colour because I guessed some of it would show through the stitching.
I began to add free machine stitching to the tail area. I started with blues and greens.
I kept adding suitable colours and building up the stitches to blend in different areas. This takes a LOT of time and thread - be warned.
When the rooster was finally complete I added a little stitching to the rest of the piece to define areas and add detail.
If you want to see more pictures of this go to my etsy shop by clicking on the etsy mini at the top of the page.

Tuesday 23 July 2013

latest felt painting

Here is my latest felt painting.
The weather has been so warm that I have seen lots of dogs cooling off like this so I decided to make a picture of it. When I needle felted the dog it looked great but after wet felting the fibres had moved around a little and the dog was slightly distorted. This is the nature of wet felting. Sometimes you have a happy accident. This time it was not so happy but it is still recognizable as a dog so the picture tells the story I intended.

Saturday 20 July 2013

New felt painting ' Patchwork Fields'

I thought I would show you my latest felt art work. It all started when I had a new delivery of Merino. There were so many beautiful greens that I wanted to use them. A few days later I noticed that all of the fields are slightly different colours at the moment because it is hay making time and the grass colour varies as it grows. Ideal opportunity
to use those greens!
Do you like the cat on the wall? The stones in the walls hold the heat from the sun and cats just love to laze around on them.

Monday 15 July 2013

felt painting of my pigs!

As many of you know I live on a small holding with my family and lots of animals. I decided to make a felt of my pigs, Polly and Belinda.
Polly is Belinda's aunt. Sadly Belinda's mother died of pneumonia  not long after she had her litter but Polly took over the raising of the piglets. One day she found a way to get in to next door's field to visit their pigs and also stole a bucket of yoghurt ( she did share it with the piglets). My neighbor telephoned me and I had to take a bucket of feed round to tempt Polly back home. As I couldn't get through the fence I had to get her to follow me down the road. She followed me and the 9 piglets followed her. Just at that moment a bus went past and I could see the passengers pointing and laughing. We must have looked funny.
Polly is getting old now and her eyesight is going. She is quite deaf too but happy grazing with Belinda and the sheep. She also sleeps a lot in the nest they make in their shed. Sometimes at feeding time I have to go and prod her to wake her up! Here is the felt.
Here is a picture of the real Polly in her nest.
The next picture is Belinda.
She is busy making the nest under Polly's instruction.

Tuesday 9 July 2013

felt painting minis

I thought I would let you know that I have just finished a series of mini felts at very affordable prices. They are made in the same way as my large felts and are sent stretched on to canvas's 5 x 8 inches / 13 x 18 cm. Here is my most recent
If you would like to take a look at the other mini felts go to the mini felt section in my shop  here https://www.etsy.com/uk/shop/SueForeyfibreart?section_id=11274296
I hope to make some more soon but am working on something a little larger at the moment.

Wednesday 3 July 2013

marauding chickens

I often have to chase chickens off of my vegetable patch because they love the tender young leaves of seedlings. Especially the cabbage family. Here is a fun felt I made about it.

I've finally done it!

After meaning to do it for months, I've finally made my etsy shop 'about' page! It is a page which tells people about me and my work. There are photographs of my studio and Belinda the pig amongst other things. Take a look and see what you think.
https://www.etsy.com/shop/SueForeyfibreart/about

Saturday 29 June 2013

My latest felt painting

I've just finished this latest felt. When we were travelling through Wales I saw a string of cottages draped around a hill. They reminded me of beads on a necklace and I just had to capture the scene in felt! To make the cottages I first made a semi felt as straight lines are difficult to achieve.

Wednesday 26 June 2013

Poppy artwork sold already

Well, yesterday's 13 hours of work paid off. The picture was sold when I woke up this morning! Taking things a little slower today.

Tuesday 25 June 2013

poppy field felt finished!

After working a 13 hour day I finally finished the felt which is my interpretation of the photo I posted yesterday. I added a few mad angles to the fields for fun. After all we have to use all of that geometry we learned at school for something.

Monday 24 June 2013

Inspiration where you least expect it.

At the weekend I went to England to visit family. Had a wonderful time and whilst out walking saw this field
The yellow area is a plant grown for it's oil and the red area is a sea of poppies. I had to take a 'photo as it is a fantastic subject for a felt with the rolling hills in the background and village tucked away in the dip. I thought I was having a weekend off! 
When I have made the felt I will show you. It won't  be exactly the same as the 'photo but will contain the key elements.

Monday 17 June 2013

Quick amendment.

In my last post I gave you the blogs I have nominated for the next round of the Liebster award. Sorry but I gave you the wrong link to Beth's blog. This is the one who makes the wonderful fused glass objects. If you wanted to check her out this is the correct link.
http://bprdesigns.tumblr.com/

Liebster award nominees

I've decided to pass the Liebster award on to these bloggers. Treat yourself and take a look at their blogs.

http://thedustyatticblog.blogspot.co.uk/
I'm choosing Anna because she finds such amazing , vintage products.
http://justsewbyrickmarsh.wordpress.com/
Shirley writes a very informative sewing blog
http://www.blogger.com/profile/13765032037968015038
Beth creates amazing fused glass products.
http://www.blogger.com/profile/17897200910051586374
Gloria is just plain fun!
http://www.yarnsandfabrics.co.uk/blog/
Karen makes fantastic wall hangings and dyes wonderful colours on to fabric.

Here are my questions for them.

1) Who is your favourite artist?
2)Are you a morning early bird or night owl?
3)When did you first start writing your blog?
4)Who is your ideal man?
5)What is your worst habit?
6)What type of music do you like to listen to?
7)Favourite holiday destination?
8)Do you sell your creations and if so where?
9)Who is your biggest fan?
10)What is your favourite weather?
11)What is your favourite TV show?

Liebster Blog Award

I have been awarded the Liebster  blog award by Yvonne from The winter Moon blog. She is a fellow member of the etsy 'Heart of Wales' team. This is a fun award where a blogger nominates 5 other bloggers for the award who have less than 300 followers. The nominee must answer 11 questions and pass the award on to another 5 bloggers. Here are the questions I have been asked-
1 - What would be your dream job?
I already have my dream job. A fibre artist.
2 - If you could be a master at any art or craft, which would you choose?
Mmmm difficult. There are so many. Maybe  lino printing. I've not tried it since school but love the effects.
3 - What was the last book you read?
I've just finished 'Inspirations' by Deanne Fitzpatrick 
4 - Where would you go/what would you do on your perfect date?
Boat trip down the Nile.
5 - Spring, Summer, Autumn or Winter?
I love the rich colours of Autumn.
6 - Do you have a favourite movie?  When did you watch it last?
Not really a favourite but I did like 'Close Encounters of the 3rd kind' I haven't watched it for about 10 years.
7 - If you could have a superpower, which would you choose and why?
 Time travel.It would be so interesting to see how people really lived.
8 - Food - Sweet or savoury?
 Sweet.
9 - Beverages - Tea, Coffee or Hot Chocolate?
Coffee.
10 - If you could meet an actor (deceased or not) who would you choose to meet?
Sean Connery.
11 - Authors - Stephen King or Katie Fforde? 
Stephen King.
I am now off to choose which bloggers I will pass this award on to and will let you know later.

Wednesday 12 June 2013

new felt paintings

In my last post I showed you a photo of buttercups. He is the felt I made in response to seeing all of those buttercups
In the last few days I went a little crazy and created this abstract waterfall picture. It has lots of silk fibres to make the sky and water shimmer.

Friday 7 June 2013

buttercup felt

Last time I posted a picture of buttercups and warned you I could feel a wild
flower felt coming on. Well here it is.

Wednesday 5 June 2013

Buttercups

I had to show you how lovely the butter cups are looking in the sunshine. I know they are classed by many as weeds but they are wild flowers.
Mmmmmm I think a wild flower felt is brewing. Probably with Buttercups in it!

Tuesday 28 May 2013

wizadry

Well the craft fair in Aberaeron was successful. Sunday was brilliant sunshine and literally thousands of visitors came. On Monday however, we had torrential rain. Even though the weather was so foul we still had visitors. I saw an some chainsaw sculptures for sale on Sunday and by the end of the day had promised to treat myself after selling just one more picture. When I saw the weather on Monday I decided that I was unlikely to sell anything and perhaps I should have it anyway to make up for what looked like a total washout. (Funny how I can talk myself in to things like that.)
Happily I did sell another picture as well as a lot of cards so did not have to feel guilty. I chose a wizard to bring a little magic to my garden. I think he looks like Gandalf and is made of solid oak. Meet Gandalf!
I think it is amazing that someone can create this with a chainsaw. The artist name is Richard Purcell. Sadly he does not have a website but can be contacted at llain.purcell@gmail.com for any enquiries.

Saturday 25 May 2013

Aberaeron craft and garden fair

Just a quick note to anyone living in West Wales. I have a stall at the Craft and garden festival in Aberaeron tomorrow (26/ 5 /13) and Monday.It will be held in the grass square where the cob festival is held.  I will be in the marquee and would love to meet you so pop in and have a chat if you're there.

Friday 24 May 2013

felt painting - 3. Adding Stitching

Today we will  take a closer look at adding stitching to your felt. Stitching can be done by hand , machine or both. It enables you to add fine details to your work and to add extra movement and texture. You will need threads to go with your design. If you are using a sewing machine you will need to be able to free machine. I use a quilting foot but you can lower the feed dogs on some machines. When sewing by hand I find a chenille needle the most useful as it has a large eye for threading thick threads and yarn but a sharp point. You will also need some sharp scissors.
The first part of the picture I usually stitch is the horizon and outlines of hills. Use cotton to match the colours you are stitching on. You generally don't want the stitching to jump out at you. I then stitch contours of the land which helps the viewers eye to make sense of distance and direction. Here is my felt with just those parts stitched.
Next I outline areas that I want to stand out such as the house and the large flowers in the foreground. I also added lowlights and highlights to the tree trunk and stitched in between the rows of flowers. The stones in the wall were outlined to help with a feeling of texture and  windows were added to the farmhouse. I've lined up the reels of cotton used in the machine stitching so you can get an idea of how many I use in my felts.
I could have stopped here but decided the work would be further enhanced by adding a little hand stitching. I've added french knots to the centres of some of the flowers and small stab stitches to some further back in the picture. I have also added a few tufts of grass against the wall. Even the most avid gardener has a few uninvited plants. Here is the completed felt mounted on a canvas.
People tend to think as the stitching as a sort of after thought but I hope this has shown what an important part of the process this is. In fact it can sometimes take as long to add the stitching as it does to lay down the fibres.
This picture was completed and listed in my etsy shop yesterday but has been sold already. However if you would like to see more photos of it. Some are closer up views. You can visit my shop by clicking on the etsy mini at the top of the page and look at my sold orders. You will still be able to access the photographs.

Thursday 23 May 2013

felt paintings - 2

Hi
Yesterday we covered the first stage of creating a felt ' painting'. Today we will go through the wet felting stage for those of you who are not familiar with it.
The first thing you need to do is place your needle felted picture on to a bamboo blind. If you are working on a small scale a sushi mat will be fine. Next you need to take your courage in both hands and dribble warm, soapy water all over your needle felt. Don't worry. The fact that the barbed needle has been used is enough to secure your fibres and keep them where you want them to be as long as you only dribble or spray the water.
Next, cover the wet  needle felt with bubble wrap. Some people use netting at this stage but I find that the woollen fibres will often felt in to the net  causing distortions when you try to remove it. Now starting in the centre press hard on the bubble wrap and moving to the edges press out any air bubbles. This will ensure good contact between the woollen fibres and pre felt so they can bond together. When you are satisfied that there are no more pockets of air spray a little soapy water on top of the bubble wrap to make it slippery. With your hand pressed flat, rub in a circular motion. Start gently and gradually increase pressure. Check your felt from time to time by lifting a corner of the bubble wrap and gently pushing your design with your finger tip. If it moves around rub more. If it is stable you can go on to the next stage. The rubbing can take anything from 15 minutes to an hour or more depending on the size of your felt and how hard you are working.
Once your design is stable you can roll up your bamboo blind with the felt and bubble wrap inside it. Have an old towel to hand as this squeezes some of the water out and you could end up with wet feet! Now roll the package backwards and forwards on the table. Count as you roll and roll for about 20 times. Unroll the blind and check your felt. There may be wrinkles in it. If there are gently smooth them out. Now you need to turn the felt so that one side is towards you. Be very careful when you pick it up as it is still quite fragile and will easily stretch out of shape. Roll up and roll as before. Turn again so the felt is upside down and repeat the rolling. Do the same with the last side. You have now rolled in all four directions and your felt should begin to feel firmer. It is usually a good idea to give it another rub and repeat the rollings again. After that place a plastic bag on your hand, remove the bubble wrap and rub again. Now repeat the rolling without the bubble wrap. By now the felt should feel more compact and thicker it should have also shrunk a little.
If you have completed the previous stages correctly  the felt should be quite stable and there is no danger of it falling apart. Fill a bowl or sink with cold water and rinse the bubbles from it. You will probably need to change the water 2 or 3 times until the water runs clear.
Gently squeeze the excess water from the felt. The next stage surprises a lot of people but it hardens the felt and makes a really strong fabric. You need to scrunch the felt up and throw it repeatedly and quite forcefully on to the table. From time to time straighten the fabric out and fold it differently before throwing again. After a time the felt will develop little bumps all over it. When this happens your task is complete. It may have pulled out of shape but you can pull it back in to the correct shape by gently tugging on the appropriate edges.
Here is my felt after wet felting. If you compare it with the photograph  of the needle felted piece in yesterday's post you will see the difference between the two. 
Place your soggy felt somewhere warm to dry ( it can be put in a washing machine, on a spin cycle first). When dry it will be ready for stitching which I will cover tomorrow.